Sudoku scanning is a systematic method of looking through each row, column, and 3x3 block to see where a number can and cannot go. A perfect first step for a beginner, you can use scanning to find single candidates, eliminate possibilities, and insert pencil marks in easy Sudoku puzzles.
Although it’s a basic Sudoku strategy, this technique is a fundamental solving skill for any Sudoku game at any level, whether you’re working on a printed puzzle or playing online Sudoku. It allows you to analyze patterns like the Phistomefel ring, note discrepancies, and establish relationships between cells, rows, and columns, helping you capitalize on a variety of strategies at all levels of play.
To use it effectively, we give you step-by-step instructions and real puzzle examples so you can learn this technique and use it to play Sudoku and advance your Sudoku game to new levels.
How to Use Sudoku Scanning
In Sudoku, you must place numbers 1 through 9 in each row, column, and 3x3 block only once. So if a 5 appears in row 3, you can’t place it in another empty cell in that same row.
The idea of scanning is simple: look at one number at a time, check where it could go, and eliminate where it can’t go. You do this by methodically reviewing all three types of Sudoku units (rows, columns, and blocks).
You can also scan column-first or box-first, but this example uses a row-first approach.
1. Select a target number.
Choose a digit to focus on, such as 1. Beginners often start with 1 and work up to 9 in order, but you can be more efficient by starting with numbers that already appear many times in the puzzle, since they have fewer placement options.
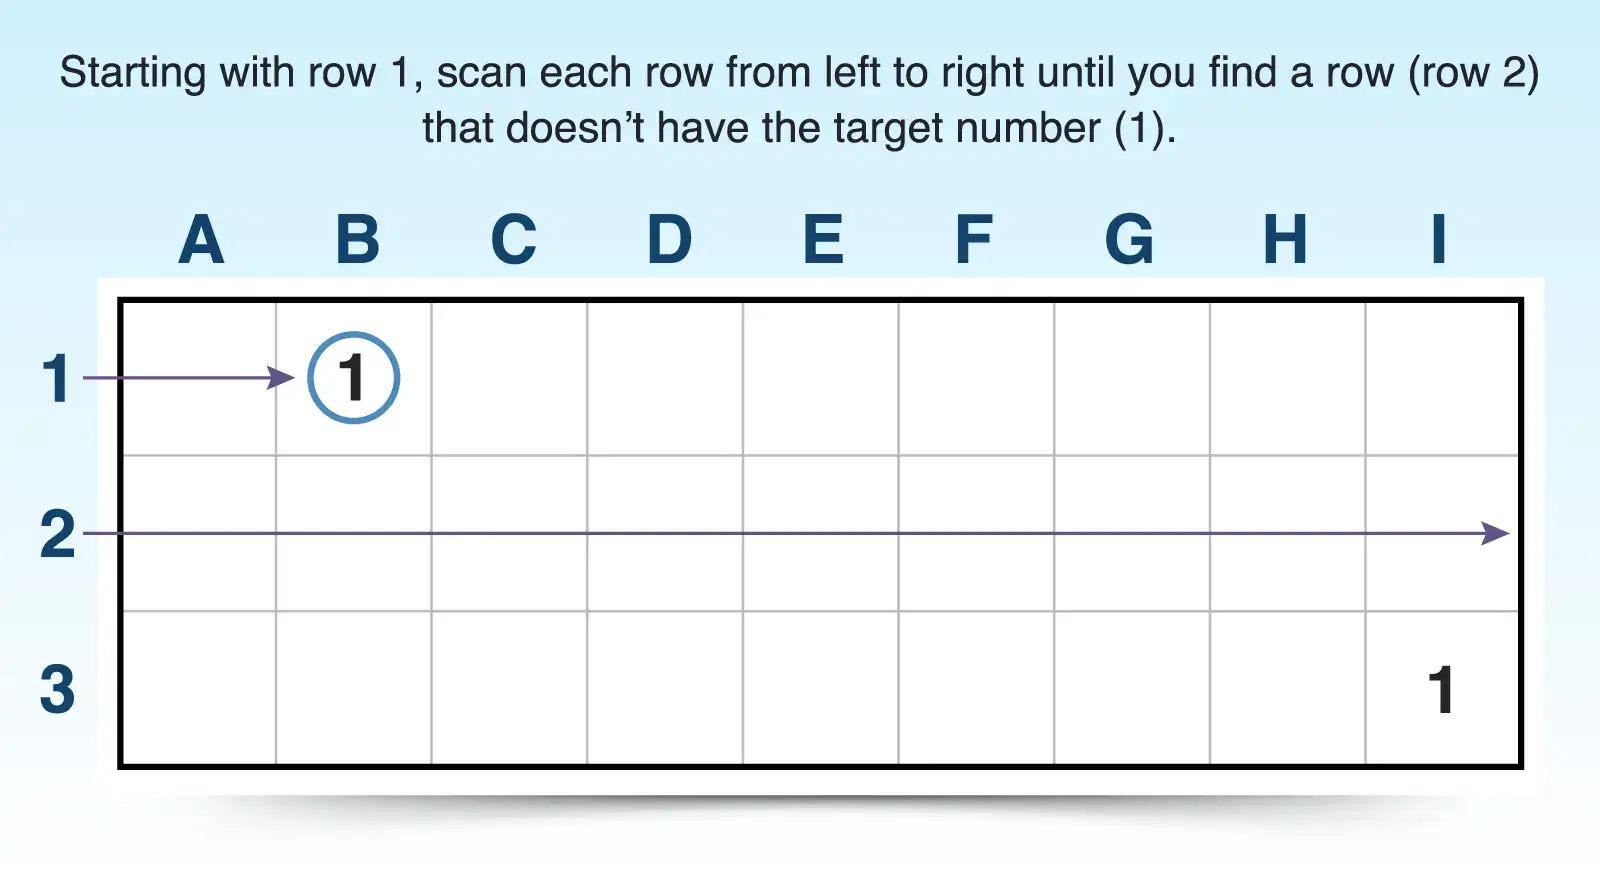
2. Scan each row for the target number.
Begin with row 1, moving left to right. If the row already has the target number, skip to the next row. If the number does not appear in a row, move on to step 3.
For example, row 1 has the target number (1) in cell B1, but row 2 does not have a 1. So you can proceed to the next step.
3. If a row doesn’t contain the target number, scan up and down columns of that row.
If you find a row that doesn’t have the target number, then scan up and down the column of each cell in that row to see if the target number appears. If the target number appears in a column, then you know it cannot go in that empty cell. If the target number doesn’t appear in a particular column, move on to step 4.
In row 2, cell A2 is empty. Looking up and down the column, A6 has a 1, which means you can’t place another 1 in that column. B2 is also empty, but B1 has a 1. C2 is also empty, and it doesn’t have a 1 in that column, which means you need to proceed to the next step.

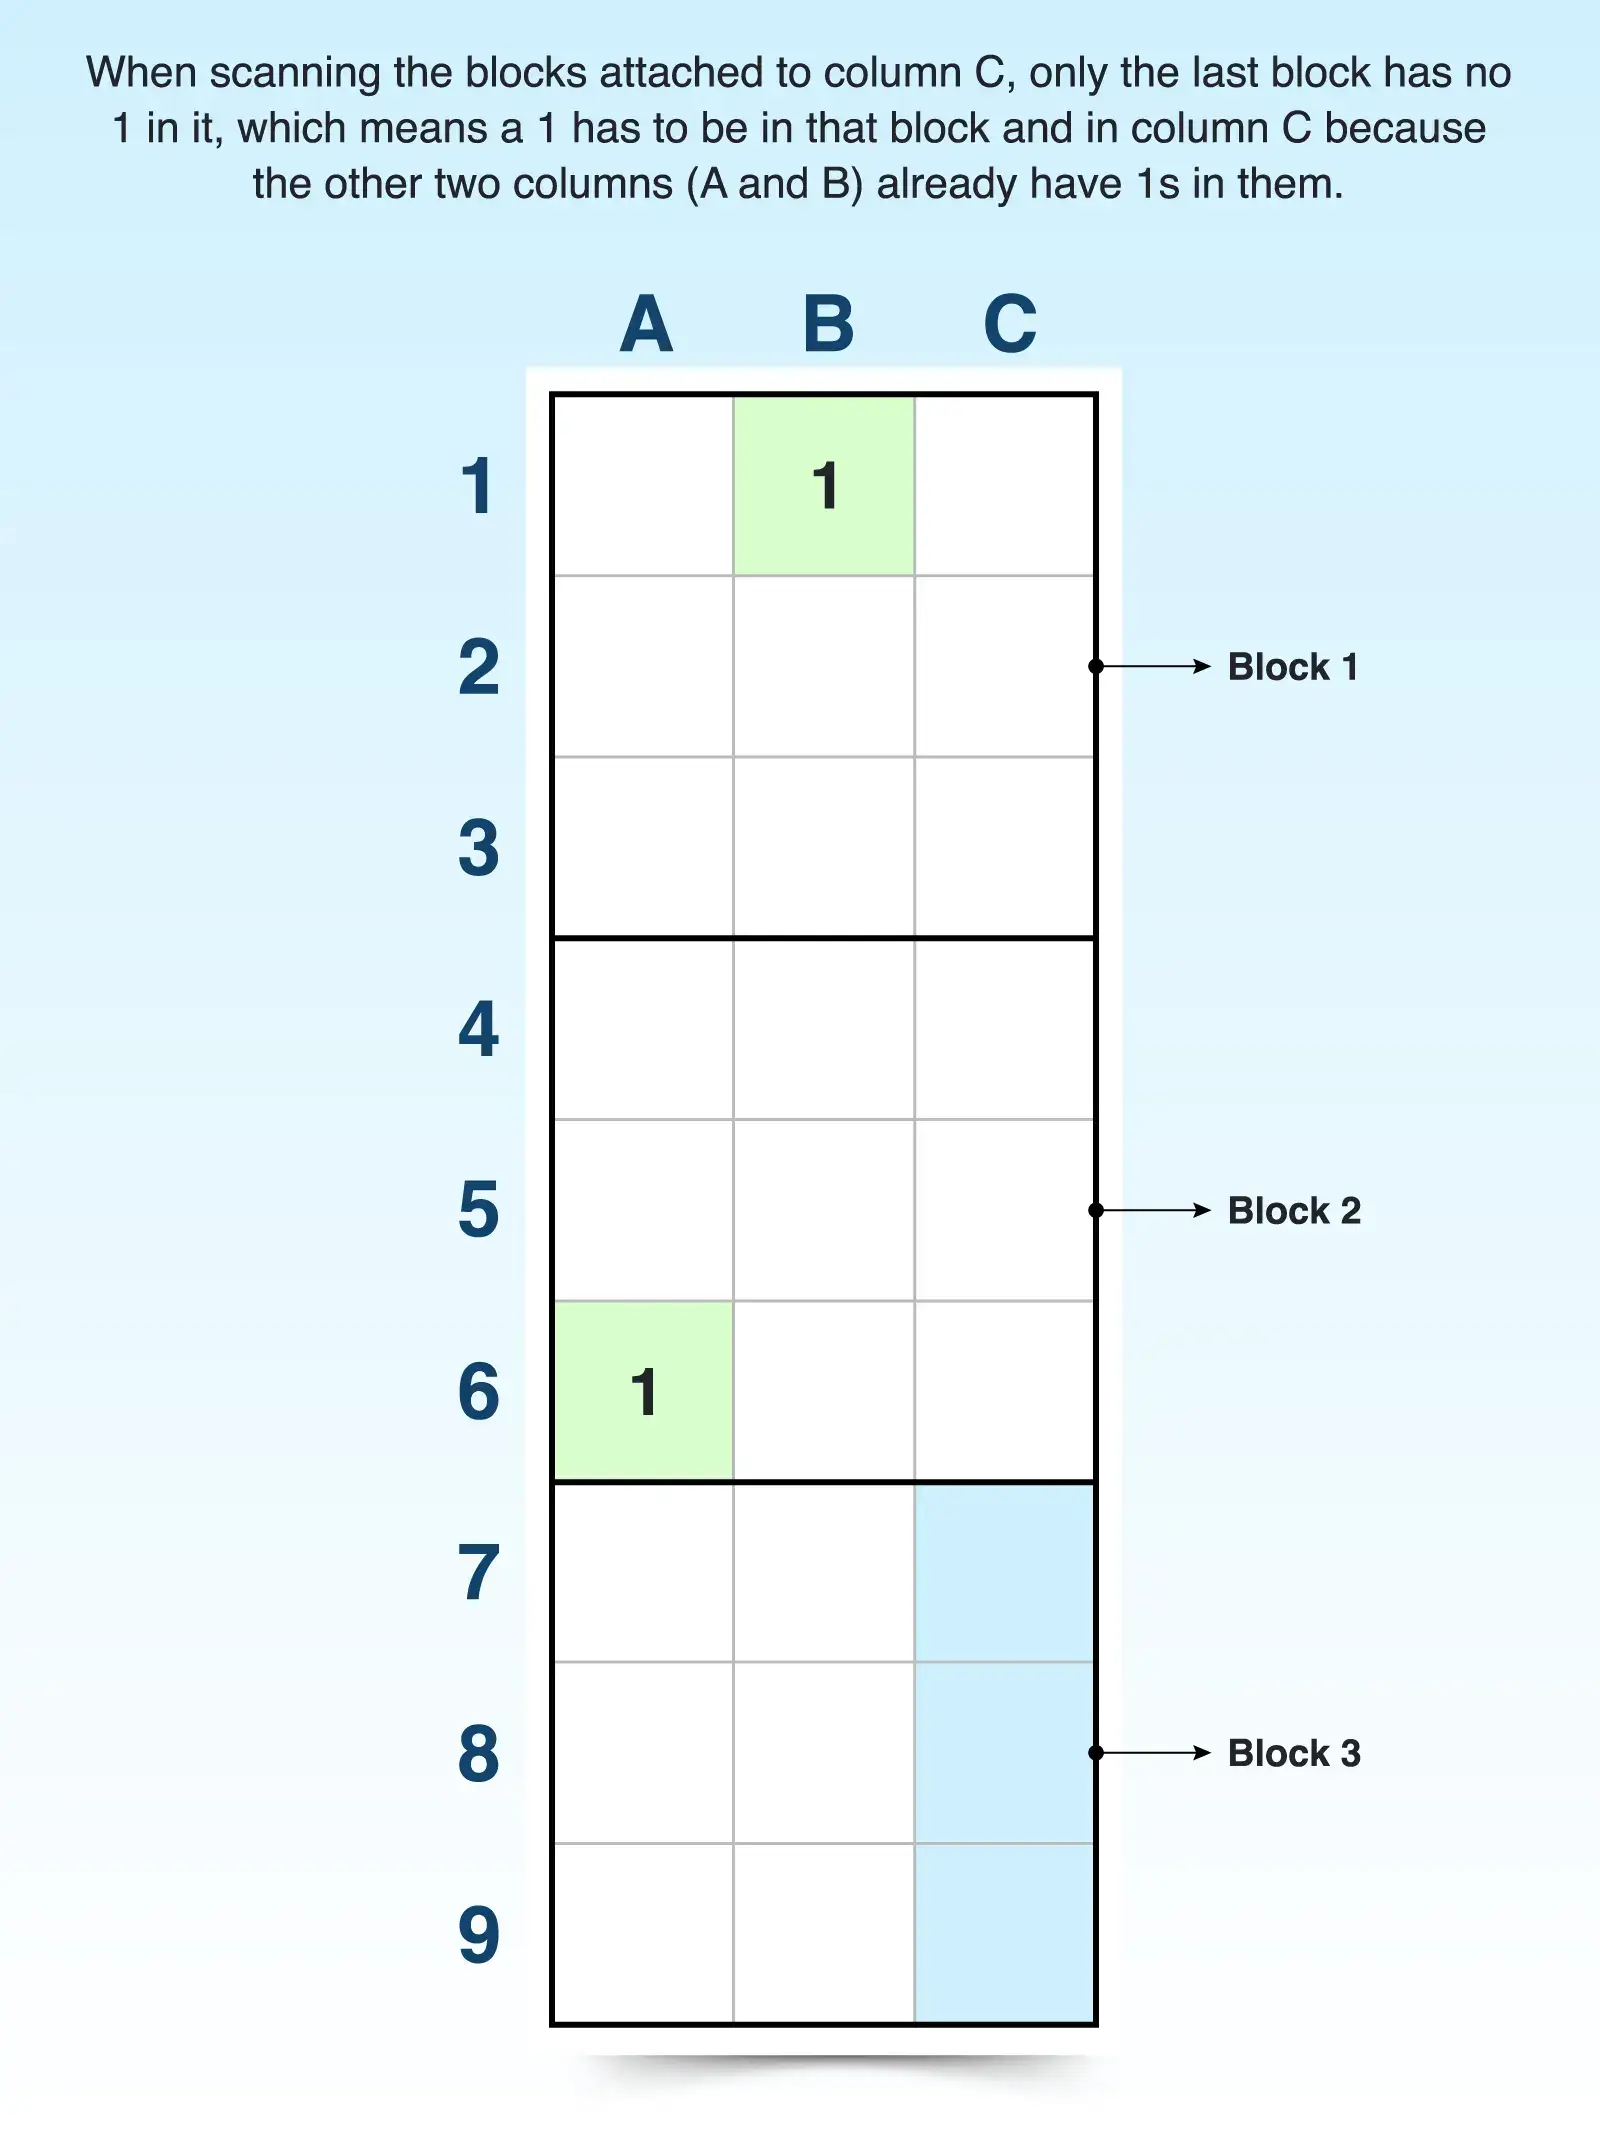
4. Scan the 3x3 blocks connected to that column for the target number.
A Sudoku grid is made up of nine 3x3 blocks, and each block can only have one of each number. So look at each 3x3 block that is attached to the column that’s missing the target number. If the block contains the target number, then it can’t be placed in the column. If it doesn’t, you’ve narrowed down where on the grid the target number can be placed and can move on to step 5.
For the blocks attached to column C, the first 3x3 block already has a 1 in B1. The next block down has the target number in A6. But the last block has no 1 in it. Moving to the last step allows you to narrow down the options.
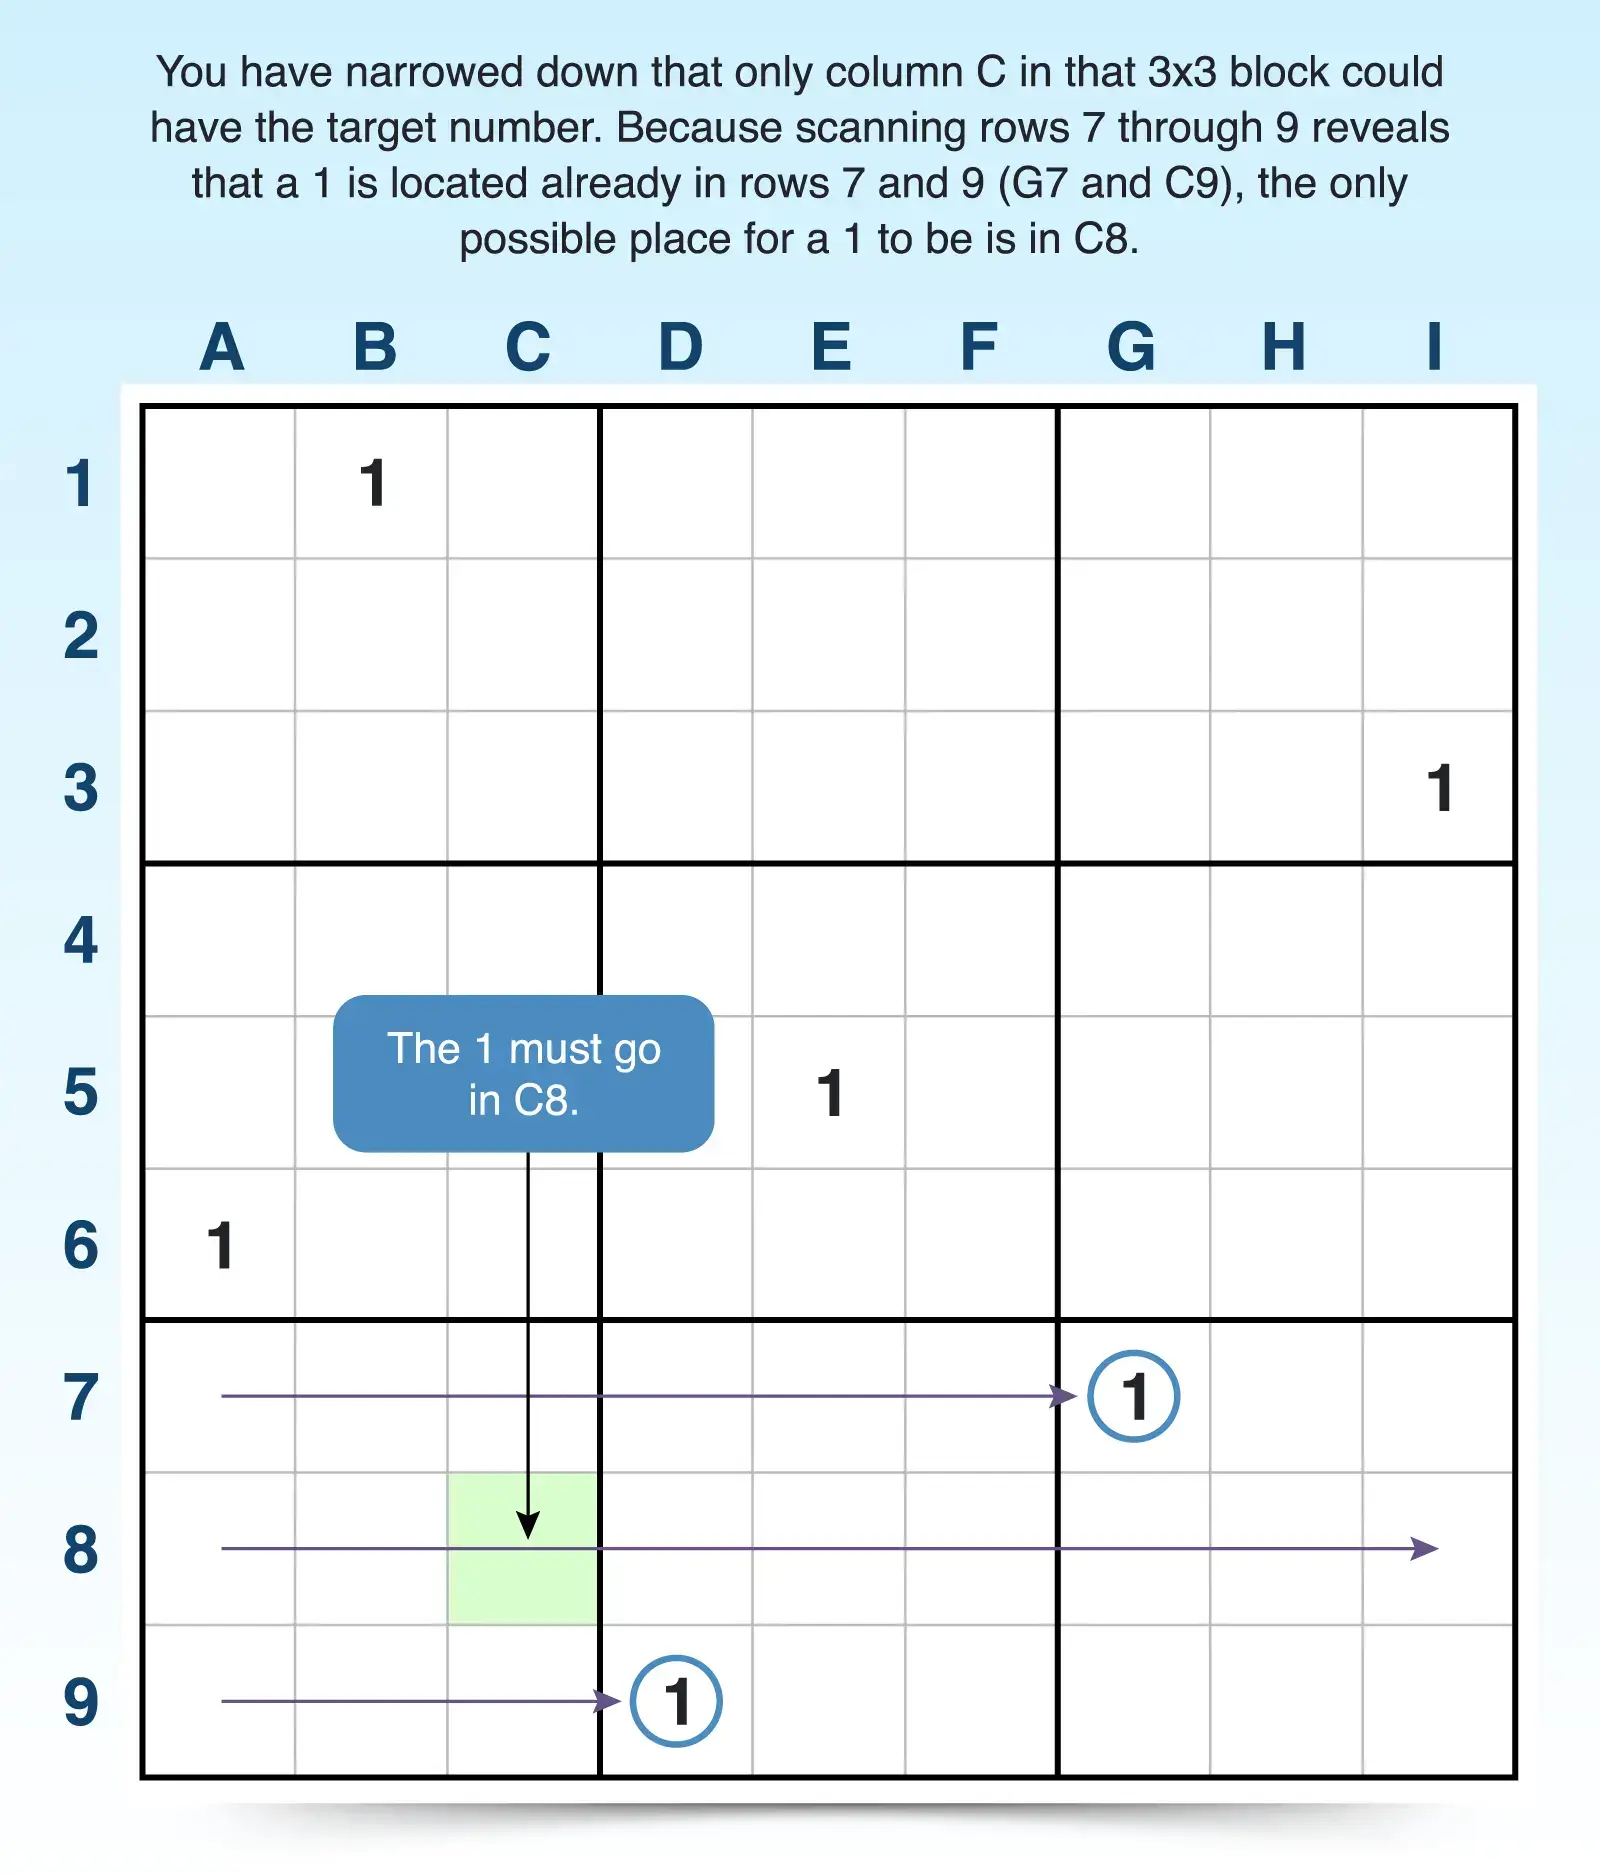
5. Scan rows and columns associated with that block for the target number.
In this final step, you’ve narrowed down where the target number could possibly be, but you may not have scanned the rows and columns for that specific block yet. So quickly scan the three rows and columns connected to that block to see where the target number appears.
- If you find a single cell that is the only possible place for the target number, you can fill in the answer.
- If you find more than one cell, you can mark the target number in those cells with pencil marks, which are small numbers that help you track which candidates are possibilities for a cell.
The target number is not in the bottom left 3x3 block. By scanning columns A through C, you confirm that only column C could have the target number because it’s already in columns A and B. By scanning rows 7 through 9 you’ll find that a 1 is located already in rows 7 and 9 (G7 and C9). Because a 1 has to be in column C and in that block, but rows 7 and 9 already have a 1, then it must go in C8.
Keep repeating these steps for all numbers until you’ve filled in all the empty cells with answers and/or pencil marks. If you end up with pencil marks, then you can use more basic Sudoku techniques to logically eliminate candidates or discover answers.
Remember that you can scan in any order you like. Just be methodical, scanning rows, columns, and blocks, so that you don’t miss anything. As you work through the steps for scanning, don’t be discouraged if you’re placing more candidate numbers in as pencil marks than answers. Especially in medium and more difficult puzzles, these pencil marks allow more Sudoku scanning throughout your solving stages.
Sudoku Scanning Examples
Scanning happens in all stages of solving, and these sections explain how different types of scanning can work together to build a successful solving strategy.
Early Solving Stage: Sudoku Scanning by Cross-Hatching
Cross-hatching is considered a basic Sudoku strategy, but it actually layers a few steps of scanning into one technique to reveal possible cells a number can be placed in. You simply draw lines from a given or answer already in the puzzle to see where a candidate cannot go.
In this example, lines are drawn from the 2 in column C and the 2 in row 6 to see what cells the 2 cannot be placed in. The only possible place for a 2 to go in the middle-left block is cell A4. Cross-hatching visually layers your scanning of one number to reveal an opening for that number within a specific unit, typically a 3x3 block.
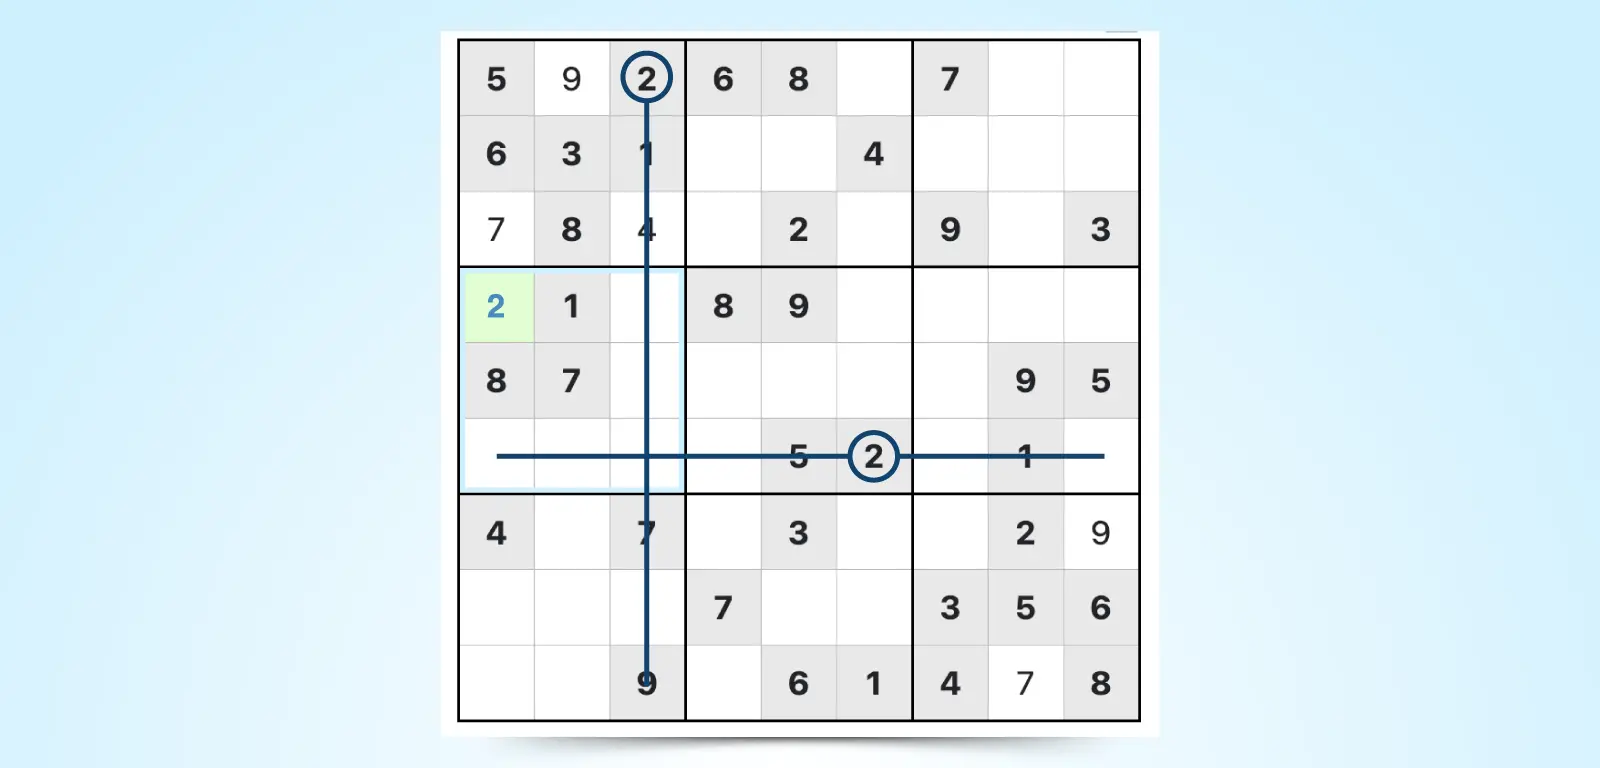
Best to use: When you see several of the same number, cross-hatching can be very effective to eliminate where that candidate can go as well as reveal open spots where only that candidate can be the answer.
Mid-Stage Solving: Sudoku Scanning to Find Naked and Hidden Singles
Whether naked or hidden, a single refers to a number that is the only possible answer for a cell. A single might be obvious (naked) because all other cells in a unit have an answer, so it’s the only number left. But a single can also appear as not so obvious (hidden) in a puzzle until you’ve taken the time to scan through it.
Naked Singles
After you’ve completed your basic Sudoku scanning you will have added some answers to the puzzle, which changes the possibilities in each unit. So scan through each unit again methodically, looking for naked singles, cells where only one possible candidate can be placed.
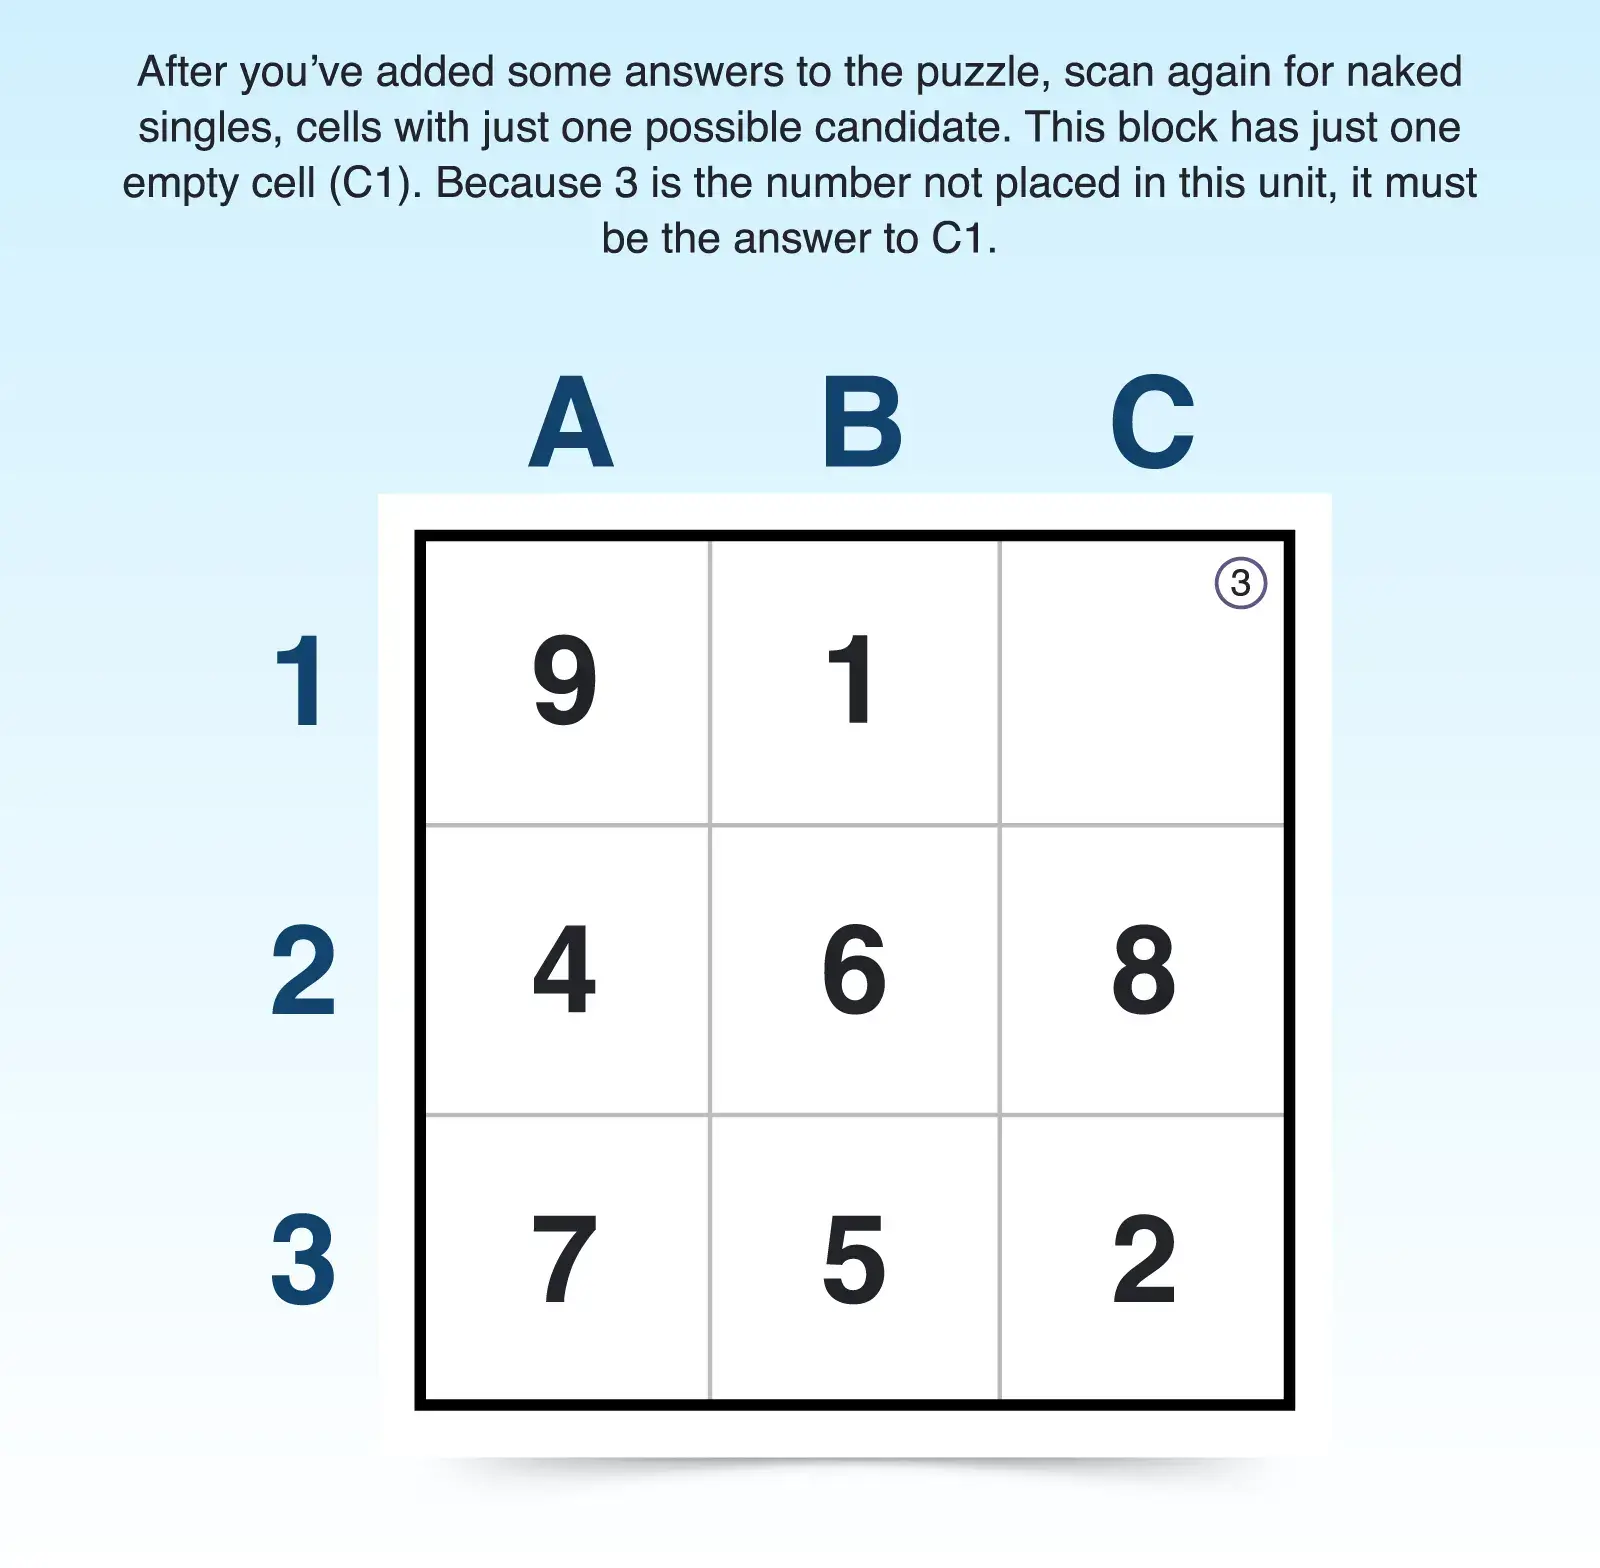
For example, the top left 3x3 block has just one cell that is empty, leaving it with just one number as the possible answer. Because 3 is the only number missing from this unit, it must be the answer to C1.
Hidden Singles
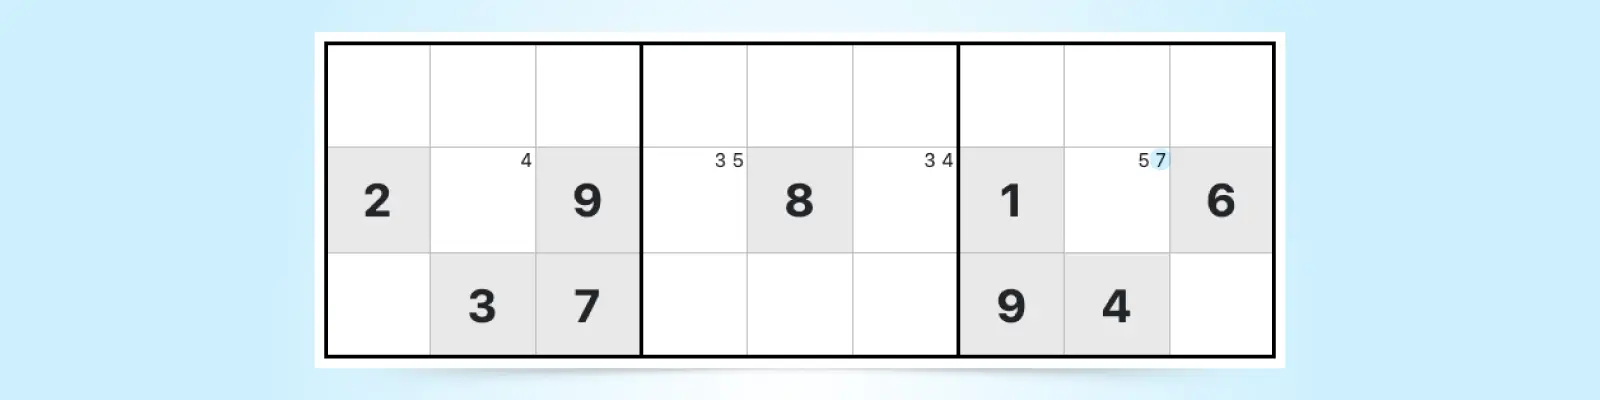
After you've found all the naked singles, scan each row, column, and box again for hidden singles. Hidden singles occur when a number has only one possible place it can go within a unit, but other candidate numbers also appear within that unit.
For example, the second row in the grid below has a lot of cells that need answers, but 7 can only go into cell B8 for that row. Even though it has more than one possible candidate in the cell, 7 is the only candidate for one cell within only that row.
Best to use: After you’ve inserted some answers throughout the puzzle, scanning again for singles can reveal more answers that can lead to a chain reaction of answers and eliminations.
Late-Stage Solving: Scanning for Repeated Candidates
Even after you’ve done cross-hatching and scanned for naked and hidden singles, you need to continue scanning as you insert answers so that you don’t miss eliminations. When you answer a cell, scan each unit (row, column, and block) associated with that cell to find eliminations.
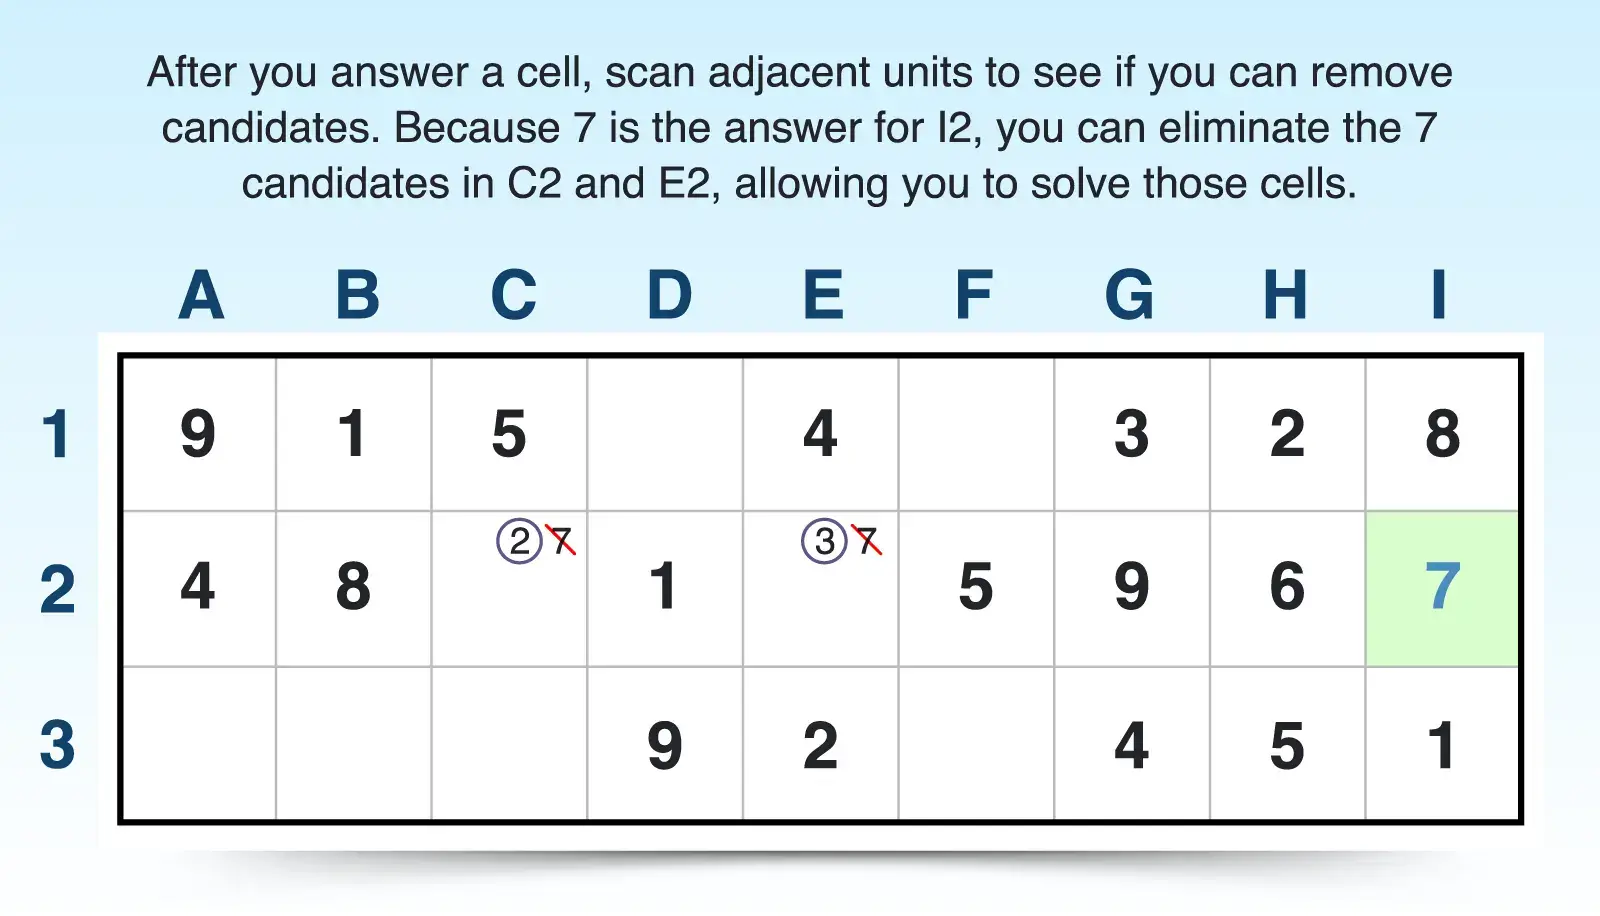
For example, 7 is the last possible candidate for its 3x3 block, making it the answer in I2. Scanning the adjacent row reveals that candidate 7 can be eliminated in C2 and E2, revealing even more answers (2 for C2 and 3 for E2).
Best to use: As you’re solving, especially in later solving stages, scan each unit where you insert an answer to ensure you’ve eliminated that candidate from other cells in the unit.
Advanced Sudoku Techniques That Use Scanning
After you’ve mastered scanning and spotting naked and hidden singles, you can progress to more advanced strategies that help you crack hard Sudoku puzzles and discover avoidable rectangles and other crucial patterns.These advanced techniques rely heavily on tracking candidate numbers and scanning patterns across the Sudoku grid.
- Naked pairs and naked triples occur when two or three cells in a unit share the same two or three candidate numbers, allowing you to eliminate those numbers from other cells in the unit. Scanning helps you identify these patterns by revealing repeated candidates across rows, columns, or blocks.
- Hidden pairs occur when two numbers appear as candidates in only the same two cells within a unit, even if those cells have other candidates. Scanning allows you to spot these hidden patterns and eliminate the extra candidates, narrowing each cell to just the hidden pair.
- X-wing is a pattern where a candidate appears in exactly two cells in each of two rows (or columns), forming a rectangle that allows eliminations in the intersecting columns (or rows). Scanning helps detect this alignment across the Sudoku grid by tracking candidate positions across multiple units. Swordfish takes this pattern a step further by adding a row (or column) to the mix.
- XY-wing involves three cells: a pivot cell with two candidates (x and y), and two pincer cells; each sharing one candidate with the pivot (one with x and z, the other with y and z). The pivot shares a unit with each pincer, but the pincers don’t share a unit with each. If both pincer cells share any common cells, scanning allows you to eliminate candidate z from those intersections, since z must exist in one of the pincers.
Sudoku scanning is effective for easy puzzles as well as more difficult Sudoku grids, and you’ll use it at every stage of solving. Learn Sudoku scanning so you can build your solving skills and progress through more advanced levels of online Sudoku puzzles.
